Introduction
The scale is one of the worst tools for tracking gym progress.
Weight fluctuates by 1 to 3 kilograms every single day depending on water retention, food volume, sodium intake, and the time you weigh in. You can be building muscle and losing fat at the same time and watch the scale barely move for months, making it look like nothing is happening when it is.
Progress pictures fix this. They capture what the scale cannot: muscle definition, posture improvements, where your body is adding mass, and where it is leaning out. A well-organized photo library is one of the most motivating things you can build as a lifter, because looking back 12 weeks and seeing a genuine transformation in black and white makes everything click.
The problem is that most people either stop taking photos because they forget, or they take inconsistent photos that cannot be meaningfully compared. This guide covers everything you need to set up a progress photo system that actually works.
Why Progress Photos Beat the Scale
The scale measures your total mass. That number includes muscle, fat, bone, water, undigested food, and every other part of you. It tells you nothing about how that mass is distributed or composed.
Progress photos measure something different: your physique, visually. When you build muscle and lose fat simultaneously, which is common in the first 6 to 12 months of training, your weight may barely change while your body composition shifts dramatically. Photos capture that shift. The scale misses it entirely.
There is also a psychological dimension. Research on self-monitoring consistently shows that visual feedback accelerates behavior change because the brain processes images faster and with more emotional weight than numbers. Seeing your lats widen or your waist narrow in a side-by-side comparison creates a visceral motivational response that looking at a spreadsheet column simply does not.
Body measurements (tape measure around the chest, waist, hips, arms) are useful but incomplete. Measurements tell you that something changed but not what it looks like. Photos tell you both.
What progress photos reveal that measurements miss:
- Muscle separation and definition (the lines between muscle groups)
- Postural changes, including improved shoulder posture and reduced anterior pelvic tilt
- Body fat distribution shifts (upper vs. lower body lean-out)
- Symmetry differences between left and right sides
- Glute, lat, and shoulder roundness that is invisible from measurements alone
When to Start Taking Progress Pictures
Now, regardless of where you are in your training.
The single biggest regret lifters have is not documenting their starting point. It feels uncomfortable to take photos when you are not happy with how you look, but those early photos become the most valuable part of your collection when you look back at them after 12 weeks of consistent training.
If you are already training but have not started progress photos, your starting point is today. Do not wait until you have lost the first 5 kilograms or gained some muscle first.
What Body Parts to Photograph
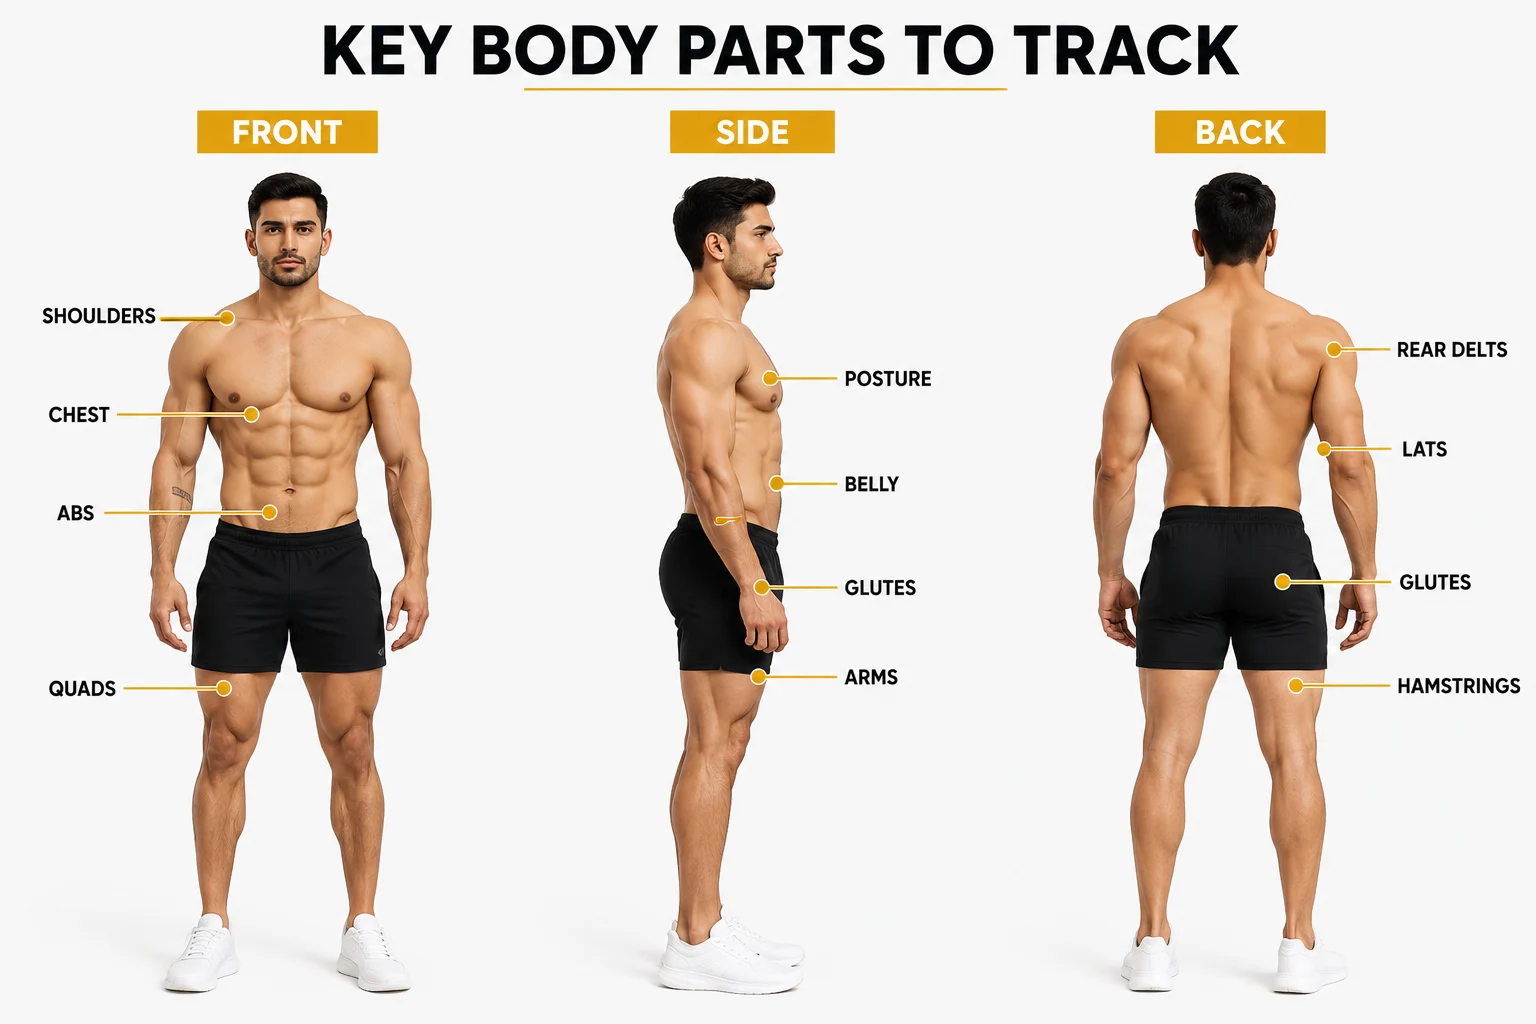
Not all progress is equally visible from every angle. Match your photo sessions to your actual training goals:
| Body Part | What It Shows | Angles to Capture |
|---|---|---|
| Chest | Pec thickness, upper/lower definition | Front (relaxed + flexed) |
| Back | Lat width, rear delt development, trap thickness | Back (relaxed + flexed, arms at sides and hands on hips) |
| Shoulders | Delt roundness, side cap development | Front + side |
| Arms | Bicep/tricep definition and size | Side (flexed) |
| Core | Abdominal definition, waist narrowing | Front (relaxed) |
| Legs | Quad definition, hamstring development, calf shape | Front + side + back |
| Glutes | Glute roundness and fullness | Back (relaxed) |
At minimum, always capture front, side, and back, these three angles together give you a complete 180-degree view of your physique changes.
The Complete Setup Guide
This is the section where most guides give vague advice. Here is exactly what to standardize:
Location
Pick one spot and use it every time. A plain, uncluttered wall works well. Avoid mirrors (camera flash creates glare), windows behind you (you become a silhouette), and busy backgrounds (they make it hard to focus on your physique).
A plain light-colored wall, off-white, light grey, or beige, works best. The more consistent and boring the background, the easier the comparison.
Lighting
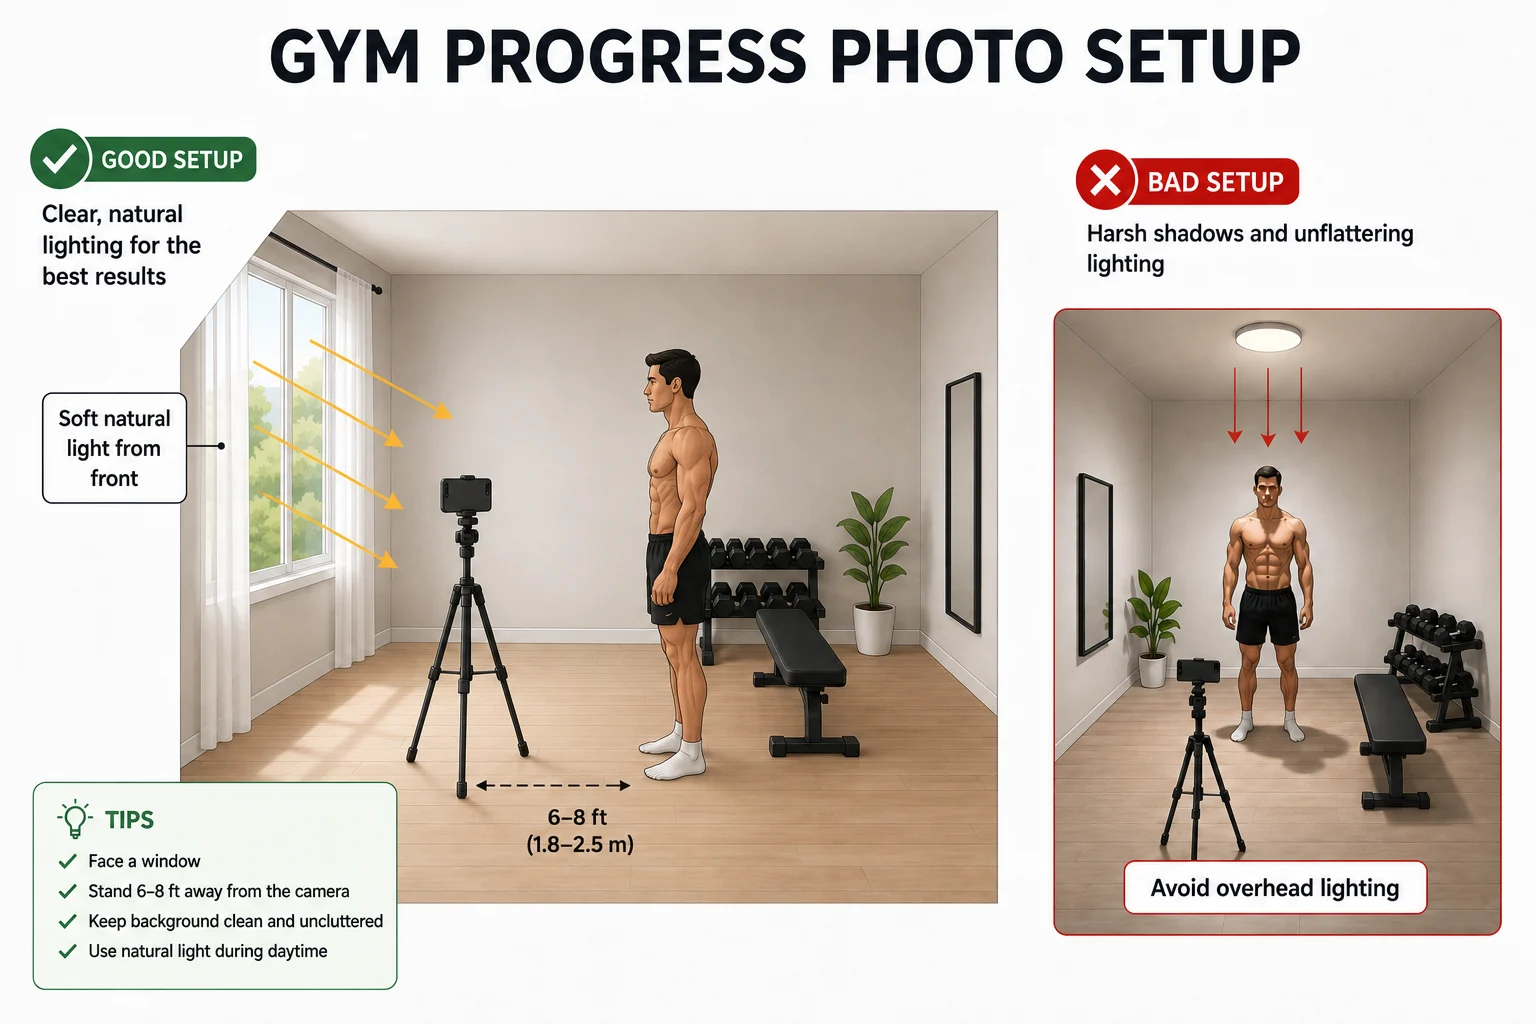
Natural daylight from the front is the most consistent and flattering light source. Face a window with soft natural light coming toward you. Avoid:
- Overhead lighting (creates harsh shadows under your pecs, abs, and brow)
- Side lighting (makes one side look more defined than the other, this is actually a great trick for moody photos but disastrous for accurate comparison)
- Direct sunlight (creates blown-out highlights and harsh shadow lines)
If you shoot indoors with artificial light, use a ring light positioned directly in front of you at eye level. Ring lights produce even, shadow-free lighting and are consistent shot to shot.
The reason lighting matters so much: the same physique in different lighting can look 10 to 15% more or less defined. A photo taken in side lighting looks dramatically more muscular than the same body photographed under overhead fluorescent lighting. If your lighting changes between sessions, your comparison becomes meaningless.
Camera and Distance
Use your phone’s rear camera, it has a higher resolution than the front-facing camera. Use a tripod or prop your phone against a stable surface. Handheld photos at arm’s length introduce angle variation that compounds over time.
Stand far enough back that your entire body fits in the frame with a little space above your head and below your feet. Do not crop your body at the edges. Mark your floor position with a small piece of tape so you stand in exactly the same spot each session.
Time of Day
Take photos first thing in the morning, before eating or drinking anything. Your body is at its most consistent state after an overnight fast: minimal bloating, similar hydration level to your previous session, and no post-workout pump. Evening photos vary too much based on daily food and water intake.
Clothing
Wear minimal, form-fitting clothing in a neutral, solid color:
- Men: shorts only (no shirt)
- Women: sports bra and shorts or fitted underwear
Use the same garment every session if possible. Fabric pattern, waistband height, and fit all affect how your proportions appear. A high waistband visually lengthens legs. Baggy shorts hide quad and glute development. Standardize everything.
Step-by-Step Photo Session Protocol
Run through the same sequence every time:
- Take the session first thing in the morning, before eating or drinking
- Use the same location, same lighting source, same distance from camera
- Set up your phone on a tripod, use a 3-second timer
- Take a front relaxed photo (arms at sides, feet hip-width apart, neutral stance)
- Take a front flexed photo (flex your chest, abs, and quads)
- Take a side relaxed photo (arms at sides)
- Take a side flexed photo (side tricep pose, or flex your shoulder and glute)
- Take a back relaxed photo (arms at sides)
- Take a back flexed photo (hands on hips or lat spread)
- Tag each photo by body part immediately so it is easy to find later
The entire session takes under five minutes once you have a system.
How Often to Take Progress Pictures
| Frequency | Best For | Risk |
|---|---|---|
| Daily | Not recommended for anyone | Too much noise from water retention and lighting variation, creates false alarms in both directions |
| Weekly | Very short-term challenges (4 weeks or less) | Minimal visual difference week to week can be discouraging even when real progress is happening |
| Biweekly (every 2 weeks) | Active cuts, aggressive bulks, or when you want frequent data | Still limited visual difference in two weeks for most natural lifters |
| Monthly | Most lifters, best default recommendation | Provides enough time for visible changes to accumulate |
| Every 8 to 12 weeks | Long-term recomposition, minimalist tracking | Best for seeing dramatic before/after comparisons |
The answer for most people: take photos monthly, but compare them every 8 to 12 weeks to see meaningful change.
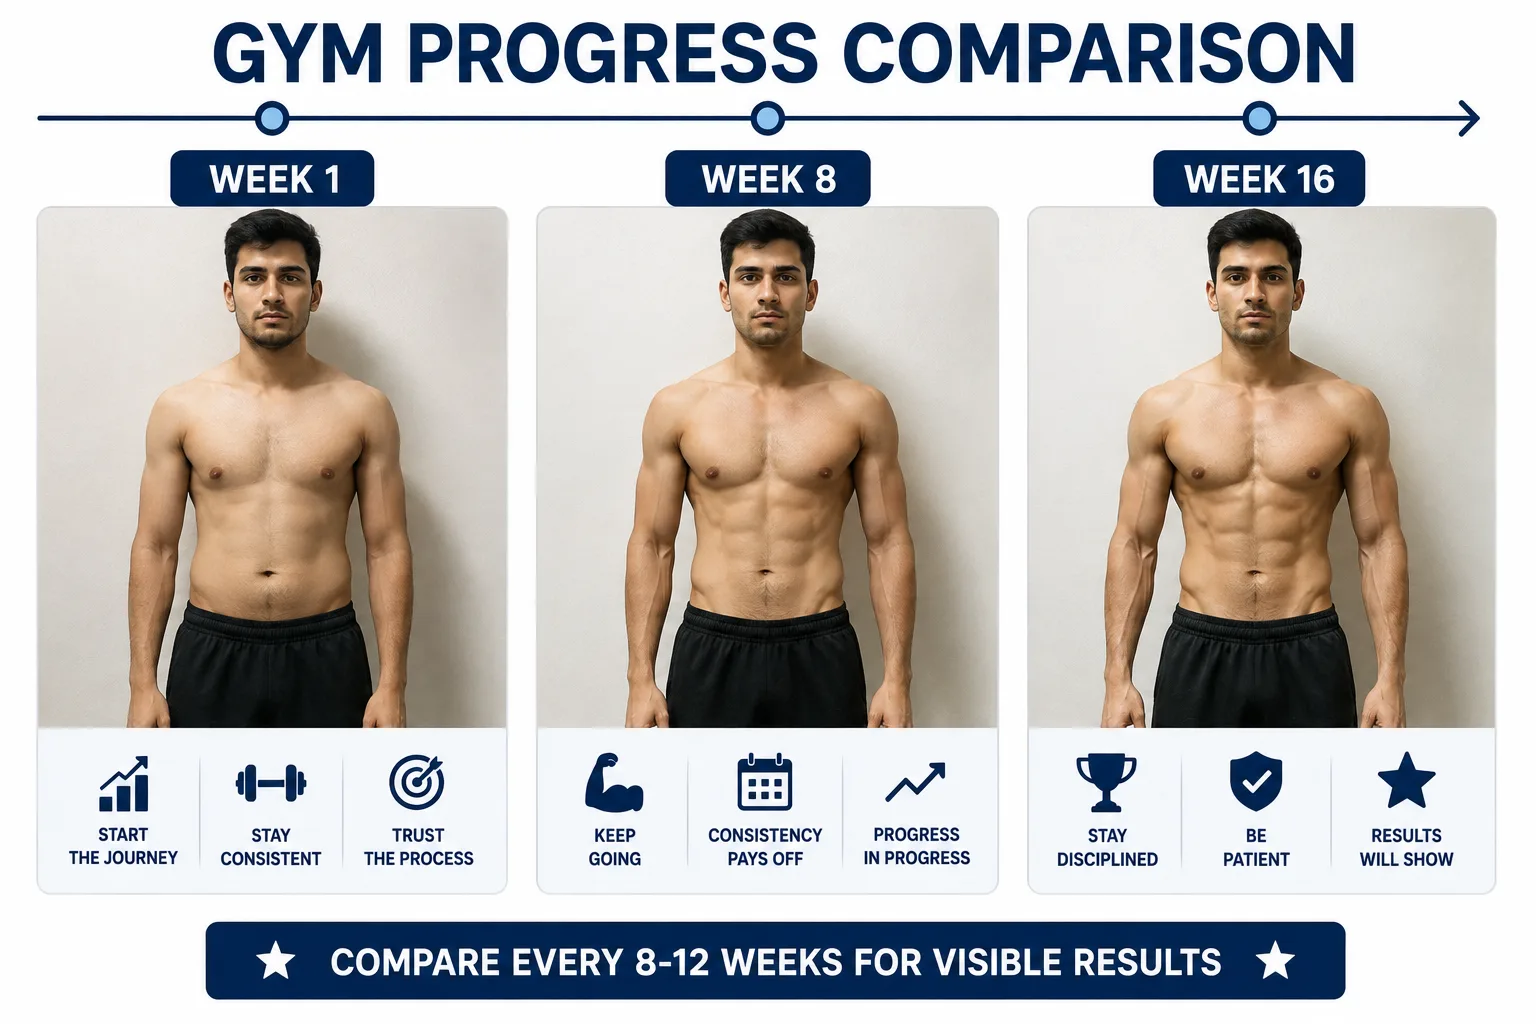 Comparing monthly is fine for data collection; seeing a 12-week comparison is what genuinely motivates.
How to Organize Your Progress Pictures
Organization is where most people’s systems fall apart. Scrolling through hundreds of photos in your camera roll to find the right comparison photo from three months ago is impractical.
Option 1: Camera Roll Albums
Create named albums with a consistent naming convention:
Progress, Front, 2026-08-01Progress, Back, 2026-08-01
Group them by date and angle. This works but is slow to compare because you have to open photos one at a time.
Option 2: A Dedicated App with Body-Part Tagging
This is the significantly better option. Sleet’s Progress Gallery is built specifically for this. When you add a photo, you tag it to a body part (chest, back, shoulders, arms, legs, glutes, or full body). The gallery then lets you:
- Filter the entire library by body part to see only your back photos, or only your chest photos, for example
- Select any two photos and view them in side-by-side full-screen comparison mode instantly
- Import existing photos from your camera roll or capture directly in the app
- Back up your entire photo library (alongside your workout data) in a single export
The side-by-side comparison mode is the feature that makes the biggest difference. Instead of trying to remember what a photo looked like while scrolling to find another one, you place two images next to each other at full screen and the difference is immediately obvious.
Sleet is available on Android and is free to download.
How to Compare Progress Photos Correctly
Side-by-side comparison is the standard. But there are right and wrong ways to do it:
Always compare:
- Same angle to same angle (front to front, back to back)
- Same pose type (relaxed to relaxed, flexed to flexed)
- Same lighting conditions (both natural light from the front, for example)
- Same time of day (both morning photos)
Never compare:
- A flexed photo to a relaxed photo
- A morning photo to an evening photo
- A well-lit photo to a dimly lit one
- Different angles
If your setup is consistent, comparisons are clear and honest. If even one variable differs, you risk misreading your progress, either seeing improvement that is not there, or missing improvement that is.
What to Actually Look For
When reviewing progress photos, train your eye to notice:
- Muscle roundness: are your delts more spherical? Is your chest thicker?
- Muscle separation: can you see the line between your pec and your front delt? Between your quad heads?
- Waist-to-shoulder ratio: has the ratio shifted as your lats developed?
- Posture: are your shoulders sitting further back? Has your lower back arch reduced?
- Glute fullness and shape: particularly visible from the back angle
- Leg development: quad sweep visible from the front; hamstring tie-in visible from the back
Pairing Progress Photos with Strength Data
Photos alone tell you what changed. Your workout log tells you why.
The most complete picture of your training progress combines both: visual progress from your photos plus strength progression from your session logs. When you can see that your chest has grown visibly in photos over 12 weeks and simultaneously verify that your bench press went from 60kg to 80kg over the same period, the correlation between your training and your results becomes clear.
This matters practically because sometimes strength gains precede visible changes in photos. Muscle takes time to grow large enough to be clearly visible, and fat loss can lag the effort you are putting in. Your workout log bridges that gap, it shows you the progress is real even when photos have not caught up yet.
Sleet combines both in one place. Your Progress Gallery sits alongside your workout logs, your AI coach, your analytics dashboard, and your plateau detection. When you want to understand why your upper chest is not developing, you can look at your exercise history, check whether you are actually programming upper chest movements frequently enough, and review your photos in the same app session.
7 Common Progress Photo Mistakes to Avoid
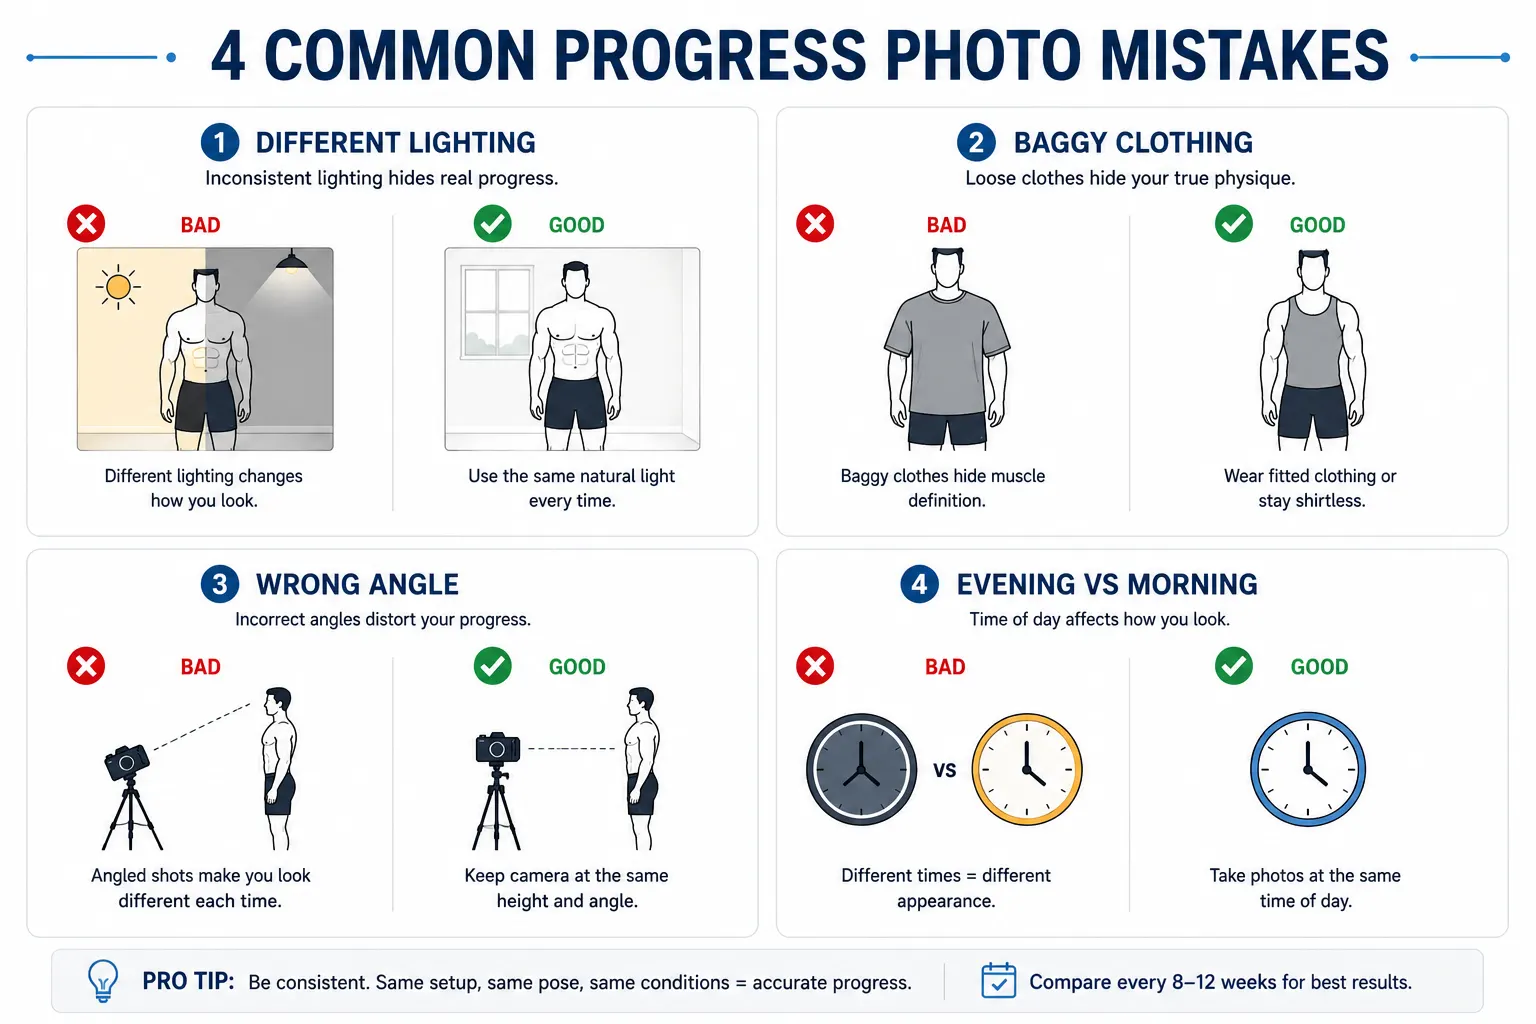
1. Changing the lighting between sessions
This is the most common mistake and the most damaging to comparison accuracy. Even switching from a morning shoot near a window to an afternoon shoot in overhead lighting makes the same body look noticeably different. Lock in your lighting setup and stick to it.
2. Taking photos too close to a recent workout
A post-workout pump makes your muscles look 10 to 20% larger than their rested size. Always photograph in a non-pumped, rested state. Taking photos before training, rather than after, keeps this consistent.
3. Comparing too frequently
Progress is genuinely slow. Muscle growth of 1 to 2 kilograms per month is excellent for most natural lifters. That rate of change is barely visible in photos over two weeks and becomes clear around the 8 to 12 week mark. If you check weekly and see nothing, you are not doing it wrong, you just need more time between comparisons.
4. Changing the pose between sessions
Slight changes in how you stand, how you angle your shoulder, or how much you are leaning affect the silhouette of your physique. Standardize your exact stance, foot position, and arm position for each photo type.
5. Not photographing all angles
People tend to photograph only the angles they feel good about. Someone building their chest will photograph the front but skip the back, missing whether their back is keeping up or becoming a weak point. Track everything, even the areas you are less proud of. That is where the most useful information lives.
6. Using front-facing camera selfies
Phone front cameras have a lower resolution, a wider field of view, and introduce a flipped mirror image that makes your dominant side appear on the opposite side from session to session. Use the rear camera on a tripod for consistent, high-quality images.
7. Letting the photos sit unreviewed
Taking photos but never looking at them is common. Photos are only motivating and useful when you compare them. Schedule a review, monthly works well. Open the comparison view, look at three months of change, and let yourself acknowledge what has happened. This is the moment that makes the entire system worth it.
The Mental Health Side of Progress Photos
Progress photos can be a powerful tool for motivation, but they can also amplify body image concerns for some people. A few guidelines:
Review at scheduled intervals, not on impulse. Opening your gallery daily or whenever you feel bad about your body is a recipe for negative feedback loops. Set a review schedule (every four weeks, for example) and stick to it.
Compare to your own past, never to other people. Social media transformation photos are staged, filtered, and often unrepresentative of natural timelines. Your photos are your only relevant comparison point.
Track changes you want, not what you think you should want. If your goal is to build a stronger back, focus your photo reviews on back development. You do not need to assess every aspect of your physique every session.
If photos are making training feel worse rather than better, stop for a while. Progress tracking is a tool, not a requirement. Workout logs, strength metrics, and how you feel in training are all valid ways to monitor progress without photos.
Using Sleet’s Progress Gallery
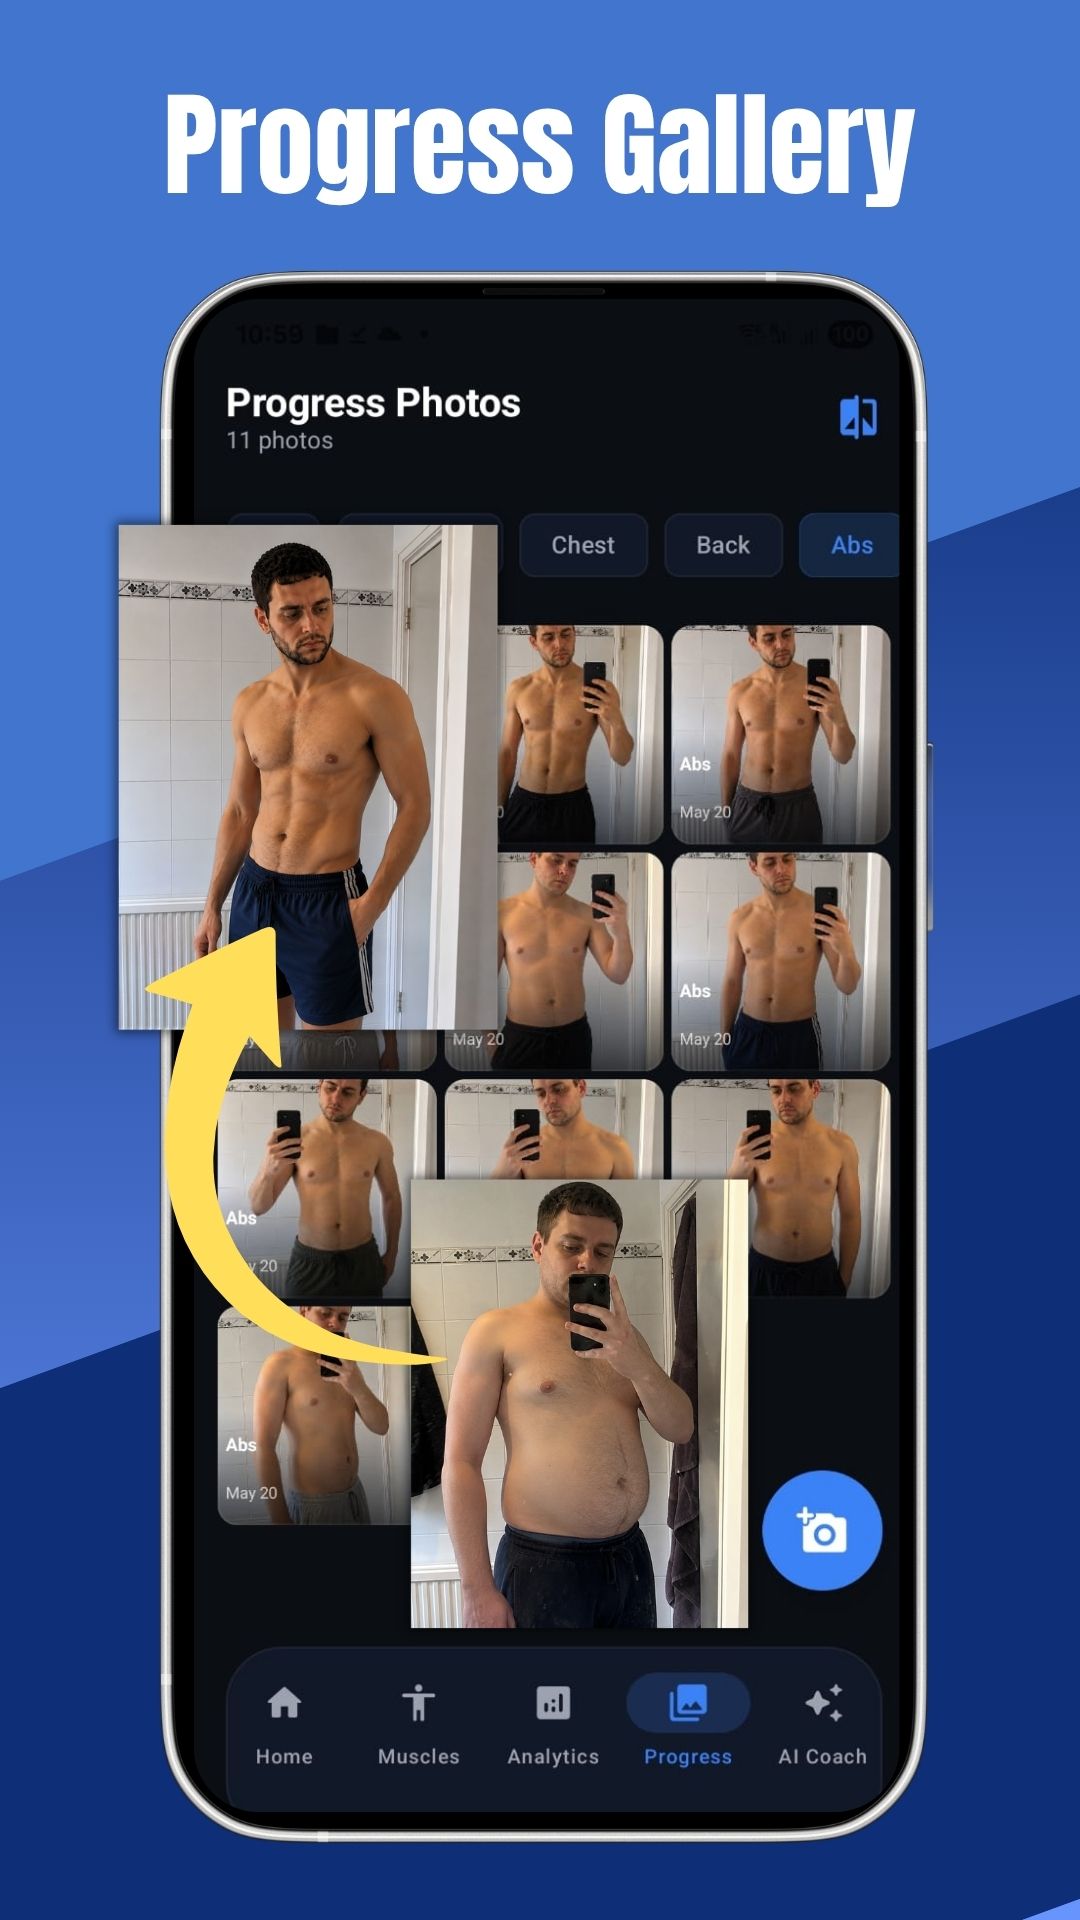
Sleet’s Progress Gallery was designed around the specific needs of self-tracking gym-goers:
Body-part tagging: When you add a photo, you select which body part it documents. This turns your photo library from a flat chronological feed into an organized, searchable archive by muscle group.
Filter by body part: Want to review only your back progress? One tap filters your gallery to show only back photos in chronological order. No scrolling through irrelevant photos.
Side-by-side comparison: Select any two photos in your gallery and view them together in full-screen. This is the feature that makes progress photos genuinely useful rather than just a collection of images sitting on your phone.
Full-screen view: Each photo opens in full screen so you can zoom in on specific areas and see detail clearly.
Integrated backup: Your progress photos are included in Sleet’s backup and restore function. One tap exports your entire training history, workout logs, analytics data, and all progress photos, as a ZIP file to your device. Your photos are safe even if you change phones.
Works alongside your workout data: Your Progress Gallery sits in the same app as your session logs, analytics dashboard, AI coach, and plateau detection. When you notice a visual plateau in your photos, you can immediately check whether your training volume or progression has stalled.
Download Sleet on Google Play to set up your Progress Gallery today.
How to Actually Build the Habit
Consistency is the hardest part of any tracking system. A few practical strategies:
Tie it to an existing habit. Take progress photos on the first day of every month, first thing in the morning, before your usual routine. Attaching the new habit to something you already do daily (waking up, morning routine) significantly increases follow-through.
Set up your gear in advance. If your tripod is in a drawer, you will skip the session. Keep it standing in your photo spot so setup takes ten seconds rather than two minutes.
Use app notifications. If your gym tracking app supports it, set a monthly reminder. A single notification on the first of the month is all you need.
Keep the session short. A complete front/side/back photo session takes under five minutes. Frame it as a five-minute investment rather than a big production, and it becomes easier to do consistently.
Review photos on a schedule, not on impulse. Pick a day, the first Sunday of every month, for example, to open your gallery and look at the past three months. Scheduled reviews create anticipation and make the habit feel rewarding rather than anxious.
Summary: Your Progress Photo System
| Variable | Recommendation |
|---|---|
| Frequency | Every 4 weeks |
| Time of day | Morning, before eating or drinking |
| Location | Same plain wall every session |
| Lighting | Natural daylight from the front, or ring light at eye level |
| Camera | Rear phone camera on tripod |
| Clothing | Minimal, form-fitting, neutral color |
| Angles | Front relaxed, front flexed, side relaxed, side flexed, back relaxed, back flexed |
| Organization | Tag by body part in Sleet’s Progress Gallery |
| Comparison interval | View side-by-side every 8 to 12 weeks |
| Pair with | Workout logs and strength progression data |
The system does not need to be complicated. It needs to be consistent. Lock in the same setup, take photos monthly, compare every couple of months, and let the results speak for themselves.